


How to write a book in word
Writing a book in Word seems like something simple and that everyone knows how to do. Just open a new document and start filling it out. The problem is that you may not like the result so much if you have not spent time before structuring the pages.
Because of that, and because an author I’ll call K. asked me how to configure Word to write, I decided to create this article.
Why is it important to properly configure your Word? You will feel better when it comes to writing. It is like using a folio filled with good handwriting, with everything well structured and clean. It will look like a real novel. It will help you to achieve a good finish and will motivate you to review or reread it when finished, and you will send your zero readers a quality copy.
In this article, I’ll show you the first steps, how to avoid mistakes, and how to use the review features when it’s your turn to self-correct.
Before going fully into the article, I want to tell you that the screenshots and references are to my version of Word. It may vary a bit in yours.
Configure the page
Before starting to write a single word, you must configure the page that you will use from now on. Thus, everything you write from the first line will come out to your liking.
We are going to work with a standard page in A4, which is the one that Word brings by default. In case you want to change the size to another of your preference, go to the Arrangement – Size menu and choose the measurements.
Paragraph
To carry out the configuration of the paragraph, you can click on the different buttons of the upper Start menu (surrounded by a red circle), or on the little arrow that you see in the image, of the block for the paragraph, which will open a box menu.
The first thing is to choose the option to justify the text. This way it will not stay aligned to the left and it will be well structured, with the appearance of a book.
Choose the line spacing. The usual option is 1.5 or 2, although you can use another that you prefer. I recommend not choosing a smaller one so that it does not look tight and makes reading difficult.
Remove the space after the paragraph. The usual thing is that this option comes by default. Create a gap between each paragraph or dialogue. This is a common mistake when writing a book in Word. Think that for the text to be correct, it has to be all together, each paragraph pasted to another, dialogue included
Fountain
Choose a simple font that is easy to read and a minimum of 12 points.
There are some recommended fonts for reading on the computer, which are those that do not have serif (san serif), that is, some “sticks” that adorn the letters. These serif (or serif) fonts are recommended for reading on paper: Times New Roman, Garamond, Book Antiqua, Georgia, Palatino Linotype, etc.
With these criteria in mind, choose the font you prefer. You can write on the computer with a san serif type Calibri, Verdana, or similar, and, when printing, choose one with serif. For example, I use Garamond for my novels, to write both on PC and read on paper. I’ve gotten used to it.
Configure options
From the top File menu, go to the Options submenu. In it, you will find a series of useful tabs.
- Review: uncheck the option “omit capitalized words” to mark the errors in these words as well. Check your grammar settings.
- Save: check the option to save every X minutes, just in case your computer shuts down. That way you won’t lose anything.
- Language: if you work with several languages, you can choose the specific one for your novel.
- Quick-access toolbar. It is very useful to have the most used buttons at the top. Great for symbols, comments, track changes, etc., and not having to search through the menus.
Bleeding
The first line indentation is used to make the text look better visually and to differentiate the paragraphs better. When there is no sangria and everything is followed, the feeling is overwhelmed.
To set the indentation, go back to the paragraph menu and mark the “first line” indentation. And next to the size. By default, it comes 1.25 cm. You can enter it more or less, according to taste.
At the beginning of the chapter or scene jump, after a narrative paragraph, the indentation in the first paragraph is usually removed and all the text is justified to the left. It is something optional that is seen more and more in novels.
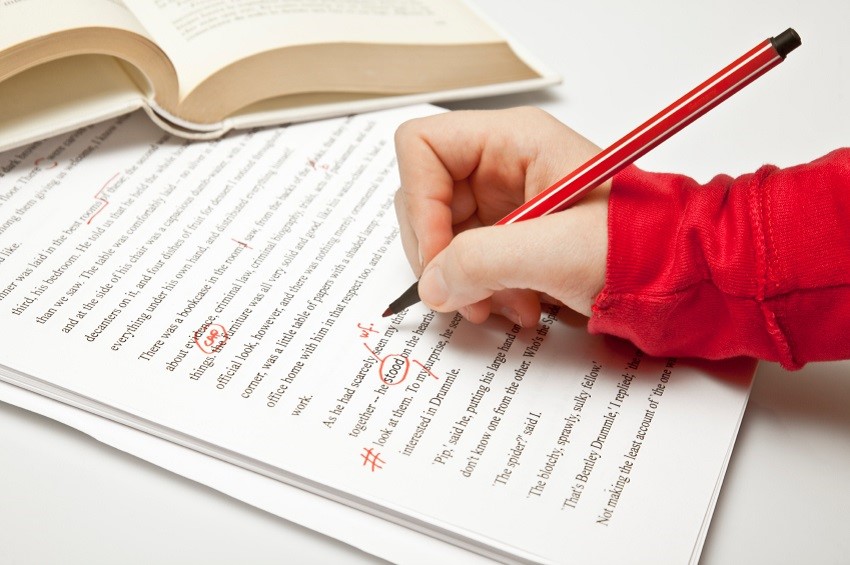
Dialogue stripes
If you want to write a book in Word, you have to say goodbye to dialogues in bullets or moles. It is a resource that gives the fix for lack of something better, but they are not correct.
Dialogs must have the same alignment and indentation as the rest of the paragraphs, something that does not happen with bullets. And they must have a different dash than the normal dash (-).
To know more about the dialogues and how to rate them, I recommend you read this article.
I leave you a sample of a fragment of Asteria, one of my novels. The first image contains a bulleted dialogue and with the wrong line, the second is correct. You can tell the difference in structure, right?
Footnotes
If you have to add footnotes to your book, clarify something, translate a text in another language, a reference, etc. do not use parentheses in the same place where you wrote the novel. Insert a footnote. It will be perfect.
To include it, go to the References menu – insert footnote. It is very simple and it is numbered consecutively. There’s no way to get lost!
Other signs
Some other signs that we can use when writing a book in Word can be parenthetical hyphens or parentheses, or quotation marks for thoughts.
Parenthetical hyphens serve the same function as parentheses and, visually, are more beautiful in the narration. But, be careful, if you are going to use them in the dialogue you will have to use the normal parentheses so as not to confuse the reader with the narrator’s dimensions.
To use these scripts we use the same dialogue line.
With respect to the quotation marks, the usual thing is to use the Latin or angular “, although it goes by taste, and other authors use the English ones. Of course, it always unifies. If you use one, the same throughout the document.
They are found in the menu Insert – Symbols. If you are going to use them often, I recommend adding the symbols menu to the quick access toolbar that I showed you at the beginning of the article. Keep reading 9 tips to read more books and make reading a healthy habit in your day to day
Revision
The good thing about writing a book in Word is that when it comes to reviewing it, it makes our work much easier. Almost all of the items I’ll tell you about now are in the Review menu.
On the one hand, we have Exchange Control. If you leave it marked, you can correct it, but in such a way as to keep the text that was there before, although with studs. Clicking on the lines on the left toggles between the corrected version and the new one.
We can also add comments in the margin. Either from the menu or with the right button on any word. That way we can leave feedback to zero readers or to ourselves if we are reviewing.
The Spelling and grammar button makes a review of the entire document. Sometimes, it warns you of errors that have happened to you but be careful, because it is not always right. For example, Word believes that a dialog dash followed by an exclamation or question mark is an error. And anything farter from reality. The script must be attached to the sign at the beginning of the dialogue. In these cases, Word would mark these correct examples as incorrect:
-I’m glad to see you!
“Have you come back?”
Other utilities
- When a word runs out of space, Word usually moves the word to the next line. This causes that, especially with certain sizes, the words are very spaced. To avoid this problem, hyphens are used and Word divides the word by syllables, just as we see in books or magazines.
You can find this option in the Layout menu – scripts
- In this same menu, we can choose the page breaks, for example, when starting a new chapter. Thus, if we change part of the text, the beginning of the chapter will never move from the beginning of the page or the texts of each chapter will not be joined.
If you want to add images such as borders, QR codes, photos, etc. go to the menu Insert – images.
- You can also add links to pages by right-clicking on a selected word or words and choosing the “link” option.
That’s all! Word has many more utilities, but I think I have explained the most basic ones and the ones that will help you have a decent book.